Here, we will go through the process of setting up the control axes, calibrating the flight controls, and assigning functions to buttons. The end result of this process (barring any hardware problems) will be a set of fully working flight controls in X-Plane.
With your flight controls plugged in and X-Plane running, you can configure how the simulator responds to input from each axis and button. Throughout this section we will refer to any input device as a joystick; the instructions apply to yokes, throttle quadrants, and rudders also.
Setting Up the Control Axes
Contents
In X-Plane, move the mouse to the top of the screen and click Settings, then select Joystick & Equipment, as seen in the image below. This will open the dialog box allowing you to configure and calibrate the flight controls. If it isn’t already selected, click on the Axis tab at the top of the screen.
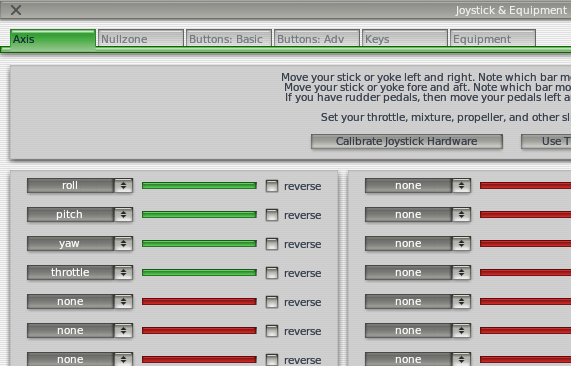
 To begin, move the joystick’s controls around to see how the axes are mapped in X-Plane. As this is done, one of the green or red bars will move for each input that is actuated. Thus, when the stick is rolled left and right only one green or red bar will move; when it is pushed back and forth another bar will move. Each control’s desired function is selected from the drop down box to the left of its bar.
The axis bars are green when they are assigned a function and calibrated, and they are red when they are not calibrated. For instance, before the throttle axis has been configured, moving the throttle might move a red bar. After assigning that bar to throttle and moving it through its range of motion several times, it will turn green.
The normal configuration of flight controls goes as follows:
- Move your joystick or yoke forward and back. A green or red bar should move as you do so. Click the drop-down menu next to it and set it to pitch. Do not check the reverse box next to this control unless, when flying, the aircraft’s pitch control is working backward.
- Move your joystick/yoke left and right. The green or red bar that moves should be set to roll. Do not check the reverse box next to this control unless, when flying, the aircraft’s roll control is working backward.
- Twist your joystick (if applicable). The bar that moves should be set to yaw. If you do not assign a yaw axis, X-Plane will attempt to stabilize yaw movement for you. Once again, do not check the reverse box unless, when flying, the aircraft’s yaw control is working backward. If you are using rudder pedals, slide them forward and backward and set the green/red bar that moves then to yaw. Additionally, only when using rudder pedals, press the left pedal down with your toes. The green or red bar that moves should be set to left toe brake. Do the same for the right pedal, and set that green bar to right toe brake.
- Move your throttle forward and back (on a yoke, this is typically the leftmost lever). Set this bar to throttle.
Note: Any bar which is not actively controlled by your hardware needs to be set to none.
Centering the Controls
With the control axes configured, you can tell X-Plane to treat your joystick’s current position as the center of its travel by pressing the Use this position as center button. Using this button will allow you to correct for flight controls that don’t return to the center of their range–for instance, a joystick that moves left to right in a range of 0 to 100, but returns to 55 when you lets go of it. Without centering such a joystick, the aircraft would constantly roll to the right.
Calibrating the Hardware
Some flight control hardware may send a signal from 0 to 1,000 when a user moves a given control from one limit to the opposite, while another device may send a signal (given the same movement of a user’s hand or foot) from, say, – 6,000 to 3,992. The only way for X-Plane to know the range of a given joystick’s input is for the user to “teach” it.
All it takes to teach X-Plane how to interpret your joystick’s signal—that is, to calibrate the joystick hardware—is to move all the axes of the joystick through their full range of motion while on the Axis tab of the Joystick & Equipment window. Be sure to move each of the joystick’s variable controls (that is, all sliders, joysticks, rudders, etc.) through their full range of motion. Take them all the way forward, all the way back, left, and right. All of this can be done quite rapidly, as X-Plane can monitor all the different inputs at once.
Assigning Functions to Buttons
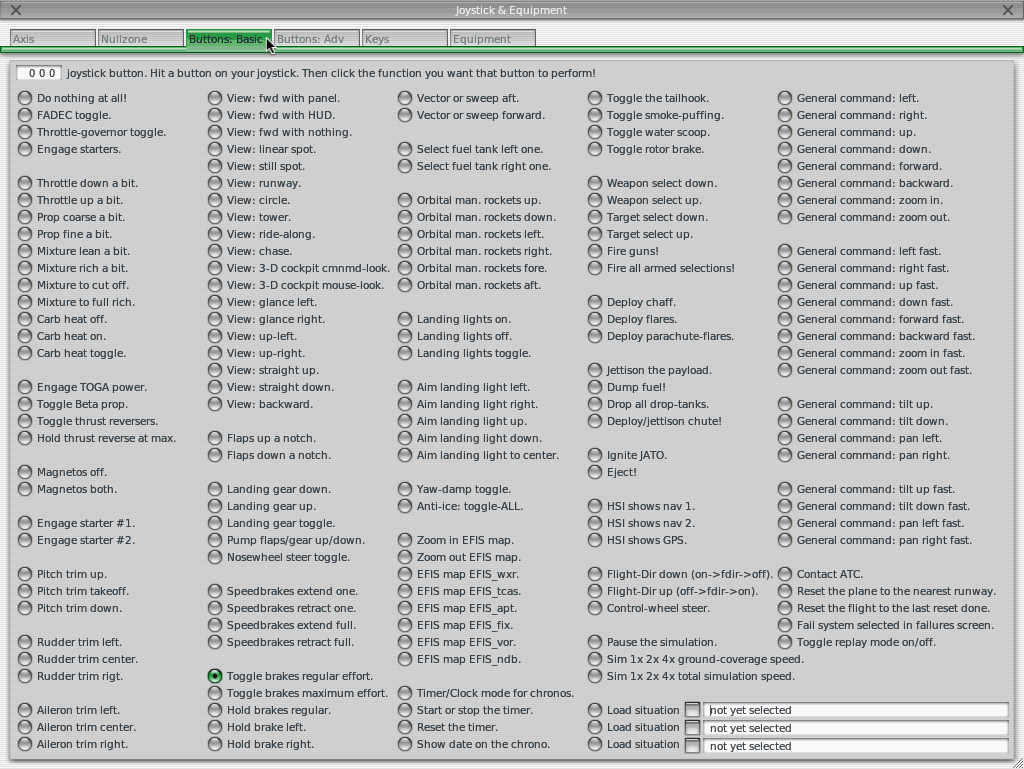
 Each of the buttons and switches on the joystick can be assigned a function within X-Plane (for example, toggling the brakes or landing gear). To do this, open the Buttons: Basic tab of the Joystick & Equipment window. As you operate your joystick’s buttons and switches you will see the box in the upper left corner change the number it displays. This indicates that X-Plane has received the input and is ready to assign that button/switch a function. The instructions below reference only buttons. They apply, however, to switches too, though a switch can have a function assigned to both its “up” and “down.” To change a button assignment, simply operate that button on your joystick and then select the function that should be assigned to it by clicking on the circular toggle next to that function. For instance, in the image to the right, button 0 has been assigned to the “Toggle brakes regular effort” function. Repeat this operation for as many buttons as need functions assigned. Close the Joystick & Equipment window and the settings will be saved.
Note: You must select the desired button by pressing and releasing it prior to assigning it a function. If this is not done, the assignment of the last button pressed will be overwritten.
To assign a function to a joystick beyond what is available in the Buttons: Basic tab, you can use the Buttons: Adv tab to assign any command function available to a button. As in the other tab, simply press the button you would like to assign, click on the command you would like to assign that button in the right half of the screen, and close the window.
Controlling Joystick Sensitivity and Aircraft Stability
To modify the joystick’s sensitivity or the stability of the aircraft, open the Nullzone tab at the top of the Joystick & Equipment screen. The three sliders in the upper right of this window control the response curves for the pitch, roll, and yaw axes of the joystick.
If these sliders are set all the way to the left, the aircraft’s response to that axis’ input will be completely linear. This means that a 50% deflection of the joystick will deflect the airplane’s flight controls 50% of their travel. As these sliders are moved to the right the response becomes curved. In this case, a deflection of the joystick from center to its halfway point may only deflect the aircraft’s controls by 10%. This will dampen any aircraft movements and desensitize the user’s controls. Keep in mind, however, that in this case, the remaining 90% of the control surface deflection must take place in the last 50% of joystick movement. Thus, the controls will be dampened for the first half or so of their travel and then become hyper-sensitive for the remainder of their throw. This gives the user plenty of fine-tune control near the center of the flight control envelope to hold altitude and roll precisely, but still allows for full control authority at the extremes.
Try flying with the sliders in various different positions to see what setting works best.
In the upper left portion of the Nullzone screen is another set of sliders, labeled “stability augmentation.” These control X-Plane’s stability augmentation by damping the predicted forces acting on the aircraft’s flight control surfaces. If these sliders are all the way to the left, then there is no stability augmentation of the aircraft. As the sliders are moved to the right, X-Plane will automatically add some stability augmentation to the aircraft, adding some elevator input to level the nose, some aileron input to minimize the roll rate, and some rudder input to counter any aircraft yaw rates. In other words, the simulator will try to make the plane easier to fly by adding control inputs for the user. The downside, of course, is that as X-Plane adds stability, the aircraft becomes less responsive (and less realistic).
Setting Null Zones
Null zones determine how much the joystick must be moved before X-Plane actually starts to take action. A null zone may be set for each joystick axis to fine-tune how responsive the control surface inputs are, but this function is typically used to prevent hardware from “creeping” in flight or to ignore the constant jittering that many older controllers will send to X-Plane.
To set a null zone, first open the Nullzone tab of the Joystick & Equipment window. Now drag the nullzone slider (found in the lower half of the window) to the desired position; the higher the percentage, the larger the “dead zone” that does not affect the aircraft’s controls will be in the joystick’s input.
Adding Special Equipment
The final tab in the Joystick & Equipment window, labeled Equipment, is used to set up special equipment for use in X-Plane. This tab is generally used on multi-computer X-Plane configurations in professional, FAA-certified simulators or to tie in various GPS navigators (such as a real Garmin 96/296/396 or a 430 GPS radio). After being connected to the computer, this equipment should be set up per the manufacturer’s recommendations, then checked off on the Equipment screen to tell X-Plane that it is connected.
Troubleshooting Problems with Flight Controls
If your flight controls are not behaving as you believe they should, see the article entitled My Joystick or Yoke Isn’t Working.
