Many systems will have the graphics drivers necessary to run X-Plane already installed. However, it may be necessary to periodically update the computer’s video drivers, either to fix a problem or to get the very best performance the system can deliver. Users of ATI video cards can download drivers here, and NVIDIA users can download drivers here.
Before updating the graphics drivers, we recommend installing and launching X-Plane (per the X-Plane 10 manual) and seeing how it runs. If any of the following is experienced, the system’s graphics drivers probably need to be updated:
-
- a screen consisting only of splashes of color
- a screen with horizontal or vertical bars running through it
- random images of various pieces of the airplane or instrument panel
- a system crash upon loading or exiting X-Plane
Additionally, if an error appears referring to a corrupt or missing .dll file, the graphics drivers most likely need to be replaced.
A high percentage of Windows-based computers are operating with drivers that are out of date or that do not currently support OpenGL (caused by using the default Windows drivers rather than those of the manufacturer). If it is determined that the drivers need to be updated, users should first determine what graphics card they have. The easiest way to do this is to use the DirectX Diagnostic tool included with Windows.
Before we begin, note that, while most of the screenshots are taken in Windows 7, the steps should be almost identical in Windows Vista, and will be very similar in Windows XP. Where they are not similar, the differences are noted.
Determining the Graphics Card Maker and Model Using DirectX Diagnostic
Contents
 To open the DirectX Diagnostic, with which we’ll determine what graphics card is in the system, open the Start menu and type “dxdiag.exe” (this will be automatically entered into the search box near the bottom of the Start menu) then press Enter. Windows XP does not have this integrated search in the Start menu. Instead, open the Start menu and click Run, or press the Windows + R keys. In the box that appears, type “dxdiag”, then press OK.
- If a box appears asking whether the program should check for WHQL-signed drivers, click no—this is not important to what we’re looking for.
- When the DirectX Diagnostic Tool appears, click the Display tab (the third from the left) at the top of the window.
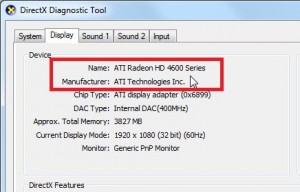
- The information we’re looking for (name and manufacturer of the graphics card) is highlighted in the screenshot to the right. For instance, in this screenshot, the video card is a Radeon 4670, made by ATI.
- Additionally, it may be helpful to make a note of the “Approx. Total Memory” line in this screen. This is the amount of VRAM present on the video card. It is important to know this number when optimizing the rendering options in X-Plane (specifically, it determines the quality of textures that can be loaded).
Using the information we just found, either continue on to read how to install drivers for ATI video cards, or skip down to install drivers for NVIDIA cards.
Installing Drivers for Video Cards Made by ATI
Downloading the Drivers
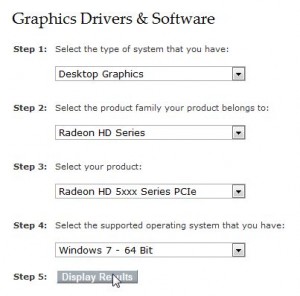
 Go to the ATI download page and select the computer’s operating system, the video card series, and the video card model. For instance, in the screenshot below, the computer is running Windows 7 64-bit and the graphics card is an ATI Radeon HD 5850. With all that selected, click Display Results (as shown in the image to the right) to open the download page.
- Scroll down to the Catalyst Software Suite and click the Download button.
- In the download dialog box that appears, navigate to the Desktop and click Save to begin downloading the file.
Uninstalling the Old Drivers
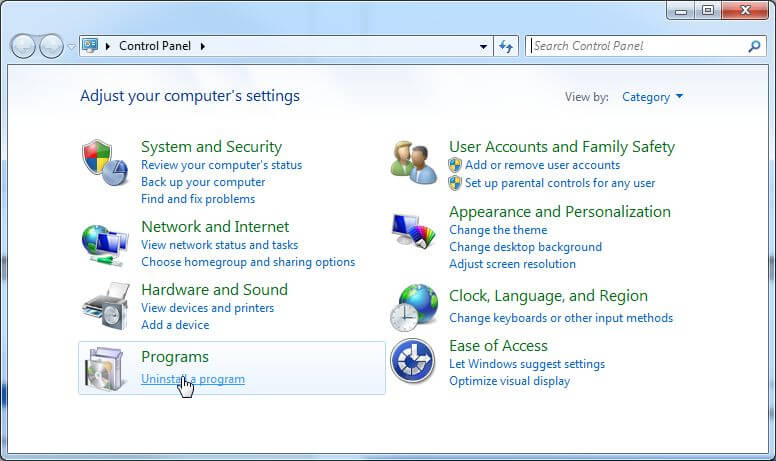
- Before installing the drivers that were just downloaded, we need to get rid of the old graphics drivers. To do this, open the Start menu and click on the Control Panel, as in the following image.
- In the window that appears, click Uninstall a Program (labeled Add or Remove Programs in Windows XP), shown in the following screenshot.

- Select the previous video display driver (for instance, “ATI Display Driver” or “ATI Catalyst Install Manager) and click the Change button (in some operating systems, this may be labeled Change/Remove).
- Click Next through the uninstall process (actual steps vary depending on which old driver is installed), and restart the computer if the uninstaller prompts to.
Installing the New Drivers
- After restarting, Windows 7 will automatically install generic drivers. This is no problem, as we will simply install the new drivers and replace these. In Windows XP, however, the computer will ask to install drivers for a generic “Video Controller.” Click Cancel, in that dialog box, because we do not want to use Windows’ default drivers.
- Double click on the driver file that was saved to the Desktop previously. If a Windows Security Warning appears, click Run.
- In the window that opens, click Install to begin the installation. The drivers will be extracted to the default destination.
- The drivers will be extracted to the default location. When the installer window appears (it may take a few seconds for it to do so), click Next.
- Click the Install button to continue.
- Select the Express option and click Next.
- When the installation completes, restart the computer.
After the computer reboots, you’re ready to fly!
Installing Drivers for Video Cards Made by NVIDIA
Downloading the Drivers
- Go to NVIDIA’s driver download page. Select the video card that was found previously. Then, select the operating system to be used and click Search to find the required drivers.
- When the page loads, click the Download button.
- Click the Agree and Download button.
- Click Save in the dialog box that appears, and save the file to the Desktop so that it will be easy to find.
Uninstalling Old NVIDIA Drivers
NVIDIA recommends not uninstalling previous versions of their graphics drivers. Only if you are installing a new graphics card after previously using ATI or Intel graphics should you uninstall your old drivers. If this is the case, see the “Uninstalling Old ATI Drivers” section above. Otherwise, simply continue on to installing your new drivers.
Installing the New Drivers
- Double click on the drivers that were previously saved to the Desktop.
- If a Windows security alert appears, click Run.
- Click OK when the file extractor appears.
- When the installer appears, click Agree and Continue.
- Select the Express installation option and click Next.
- The drivers will install automatically. When they are through, click Restart Now.
Following the restart, you’re ready to fly!