Hi! It’s the X-Plane team again.
A couple days ago, we talked about finding a virtual version of your favorite aircraft on the Web and adding it to X-Plane. (If you missed that email, you can read it online.) This is the second email in the course you signed up for about getting the most out of X-Plane.
This time, we’d like to help you fly a final approach to an airport, so you can both keep up your stick-and-rudder skills and practice some tricky situations (like landing in a crosswind or a storm). In fact, we know a number of certified flight instructors who recommend that their students practice just like I’m going to show you before coming in for a flight review—it saves the student money, and it saves the instructor time that they can be using with other students.
If you don’t want to set up your own custom approach, don’t forget you can also try the Landing in the Cessna 172 tutorial in Flight School.
Choosing an airport
If you’ve been following this series of emails, you probably choose your airport using the Location box in the Flight Configuration screen. However, using the following method you can select not just which airport you go to, but also where in that airport you start.
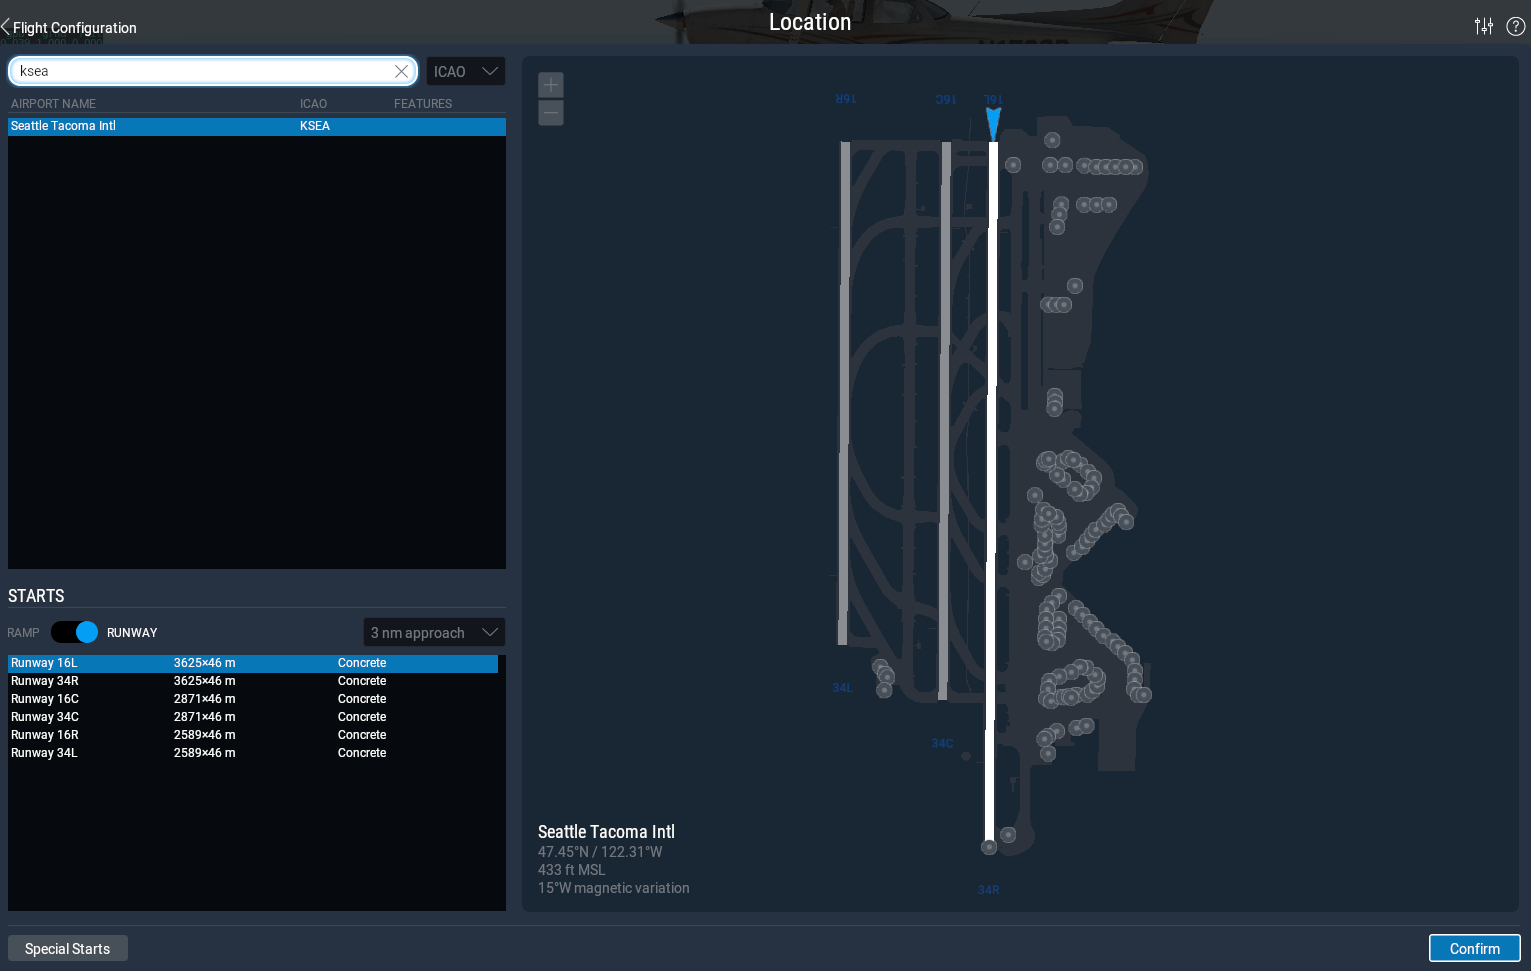
So, let’s get back to the Flight Configuration screen. If you’re in a flight already, open the menu by moving your mouse to the top of the screen (or using the Esc key), then click on the plane icon in the right corner. Click on the Customize button in the top right Location box. Just like in the previous screen, you can search for an airport either by name or by ICAO identifier. Unlike the Flight Configuration screen, though, this screen shows the airport layout, which you can click on to place your plane.

Since we want to try an approach, let’s search for KSEA (the default airport). Note: If your aircraft is moved to an area that does not have any scenery installed, you will see nothing but water and maybe a small runway. Since the demo doesn’t include the global scenery (which is only available by buying X‑Plane 11), you probably want to stick to the default airport in Seattle (whose identifier is KSEA), where you do have scenery installed.
In the Starts box in the bottom left, toggle the button to Runway, then click on the drop down menu and pick 10 nm approach. Click on a runway in the list, then the Confirm button to go back to Flight Configuration.
Changing the weather
For your first approach, you probably want to stick with nice weather without much turbulence, so drag the weather slider all the way left to set Clear conditions. In the future, though, you can set the weather to all kinds of nasty conditions! For a detailed breakdown of how the weather in X‑Plane can be controlled, check out the section titled “Setting the Weather” in the X‑Plane manual.
Flying the approach visually
Once you have everything set the way you want it in Flight Configuration, click on the New Flight button and X‑Plane will put your airplane 10 nautical miles from the runway, at a decent altitude.
Your goal is to slowly descend down to ground level, while keeping your airplane lined up with the runway. If you’re in a small, general aviation airplane (like the Cessna 172SP), you want to keep your speed a bit above stalling speed. (For the 172, stalling speed is about 65 knots, so aim for 90 knots or so, lowering your speed as you get closer.)
Follow a shallow glide path in to the runway—that is, point the nose down between 3 and 5 degrees. Keep an eye on the PAPI lights to the side of the runway. You want to see an equal number of red and white lights. If you’re above the glideslope you’ll see more white lights than red, and vice versa if you’re too low.
By the time you get to the runway, you want to be right at stalling speed, with your power at zero and flaps at full. (Hint: By default you can extend flaps one detent with the ‘2’ key.) Right before the aircraft reaches the ground, raise the nose up to about 7 degrees for a gentle touchdown.
Did you make it?! If not, just set up your approach like before and try again!
Flying on instruments
If you’ve gotten the hang of the visual approach, you might be interested in trying an instrument approach. You can find all the details in the “Flying an ILS Approach” tutorial, or in the portion of the X‑Plane manual titled “Flying an Instrument Approach in X-Plane.”
Until next time…
We hope you enjoyed this flight. In a couple days, we’ll send you a guide to more awesome tools you can use with X‑Plane to make you a better pilot.
Until next time,
– X-Plane Customer Support
P.S. At this point, you might be getting tired of the 15 minute time limit on the demo. If you want to remove that limit (and get the whole world worth of scenery, too), you can buy X-Plane 11 from our web site.